Increase the safety and performance of your vehicle. Learn the 10 essential tips to optimize your brakes, from daily use to track days.
A vehicle’s braking system is much more than a simple set of parts; it is your first and most important line of defense on the road. While engine power and speed often steal the spotlight, true automotive mastery lies in the ability to stop safely and precisely. Ensuring your car’s brakes are always at their peak performance is crucial, not only for your protection but for everyone around you.
This comprehensive guide has been meticulously crafted to demystify the braking system, turning you, the driver, into the primary guardian of your vehicle’s safety and performance. We will cover 10 fundamental steps that will take you from basic diagnosis to component optimization, providing unprecedented control and the confidence to tackle any road.
The Foundation of Safety: Diagnosis and Preventive Maintenance
The longevity and effectiveness of your car’s brakes begin with proactive attention. Understanding the signals your vehicle sends and performing preventive maintenance are the pillars for ensuring this vital system functions perfectly.

Tip 1: The Power of Sensory Diagnosis – Listen, Feel, and See Your Brake Signals
Even before a warning light illuminates on the dashboard, your car is communicating. Learning to interpret sounds, sensations, and visual cues is the first step toward mastery in automotive maintenance. Your senses are powerful diagnostic tools.
- Auditory Analysis: Decoding Braking Sounds
- High-Pitched Squeal: A metallic squealing, especially during light braking, is the most common warning. It generally indicates that the pad wear indicator (a small metal tab) is starting to rub against the rotor. It is not an emergency, but it signals the need to schedule a pad replacement soon.
- Metallic Grinding: This harsh, continuous sound of metal scraping against metal is a critical alarm. It means the brake pads are completely worn down, and the metal backing plate is in direct contact with the rotor. This severely compromises braking and can cause irreversible damage to the rotors, requiring costly replacement. Stop the vehicle and seek a specialist immediately.
- Clicks/Clunks: Clicking or clunking sounds when braking or releasing the pedal may indicate loose components, such as poorly adjusted calipers or suspension issues manifesting during weight transfer.
- Tactile Analysis: Interpreting Pedal Response
- Spongy/Soft Pedal: A “sponge-like” feeling when pressing the brake points to the presence of air or water vapor in the hydraulic system. Brake fluid is incompressible; air or vapor (generated by old, water-contaminated fluid) is compressible, robbing braking effectiveness. This is a dangerous symptom requiring immediate attention.
- Hard Pedal: If the pedal requires excessive force to slow down, the problem is usually in the assist system, such as the brake booster (vacuum assist). A cracked vacuum hose or a ruptured internal diaphragm can reduce assistance, making braking tiring and dangerous in emergencies.
- Low Pedal: A pedal that sinks too far before engaging the brakes may indicate excessively worn pads, a need for adjustment on the rear brakes (in drum systems), or a leak in the master cylinder.
- Judder/Vibration: Feeling a pulsation in the pedal or steering wheel while braking is a strong indication of warped or unevenly worn brake rotors. This occurs due to overheating and affects the pad contact area with the rotor.
- Visual and Olfactory Analysis: Additional Signs
- Directional Pulling: If the car “pulls” to one side when braking, it could be a seized caliper, an obstructed hose, or uneven pad wear.
- Dashboard Warning Light: The brake light (usually a circle with an exclamation mark or the letters “ABS”) is a direct alert. Never ignore it. It could indicate low fluid level, pad wear, or an ABS issue.
- Burning Smell: A strong, acrid smell, similar to burnt carpet, after intense braking, such as on mountain descents, indicates extreme overheating (fade), which can temporarily reduce brake efficiency and cause permanent damage.
Learning to discern these signs allows you to prioritize maintenance. A squeal is a warning; a grind is a distress call. A spongy pedal demands swift action, while a complete loss of resistance signals a catastrophic failure.

Tip 2: Detailed Visual Inspection – The Check-up You Can Do Yourself
Complementing sensory diagnosis, visual inspection offers concrete evidence regarding the condition of your brakes. It is a proactive check that can be performed during tire rotation or replacement.
- Preparation and Safety:
Always park on a flat, level surface. Ensure the brakes and wheels are cool. When lifting the vehicle, use a jack on safe points and always support it on jack stands for maximum safety.
- Brake Pad Inspection:
- Through the Wheel: On vehicles with alloy wheels, use a flashlight to check the thickness of the outer pad through the spokes, toward the caliper.
- Thickness: A new pad is about 1.5 cm thick. Replacement is recommended between 3 mm and 5 mm. Less than 3 mm is critical.
- Uneven Wear: Check if the inner and outer pads have similar thickness. Uneven wear indicates caliper issues (seized piston, corroded slide pins), which must be corrected to prevent premature wear of new pads.
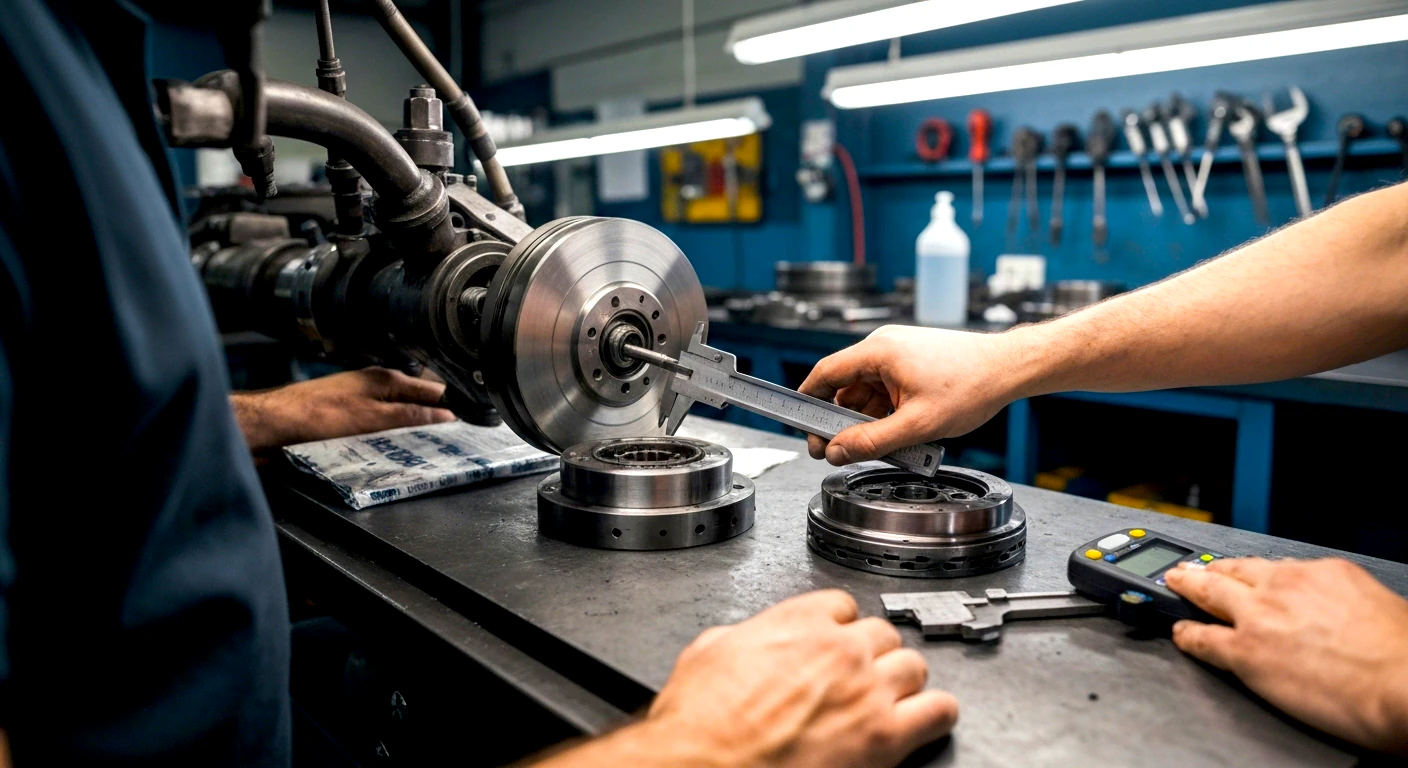
- Brake Rotor Inspection:
- Surface: The contact surface should be smooth. Look for deep grooves, sharp scoring, or bluish/dark spots, which indicate overheating.
- Minimum Thickness (MIN TH): Check the “MIN TH” (minimum thickness) marking on the edge or hub of the rotor. This is an absolute safety limit.
- Measurement: Use calipers or a micrometer at several points. If the thickness is equal to or below “MIN TH,” the rotors must be replaced in pairs on the same axle. A rotor below minimum thickness cannot dissipate enough heat, leading to issues like fluid boiling and even cracks.
- Identifying Fluid Leaks:
- Examine the flexible hoses for cracks or swelling.
- Check around the calipers and bleeder screws for signs of moisture or dirt buildup (brake fluid is corrosive and attracts dirt).
- Look for fluid stains (amber to dark brown color) on the ground under the car, near the wheels.

Tip 3: Brake Fluid: The Heart of the System – Checking, Changing, and Bleeding
Often neglected, brake fluid is the pillar of the hydraulic system. Its maintenance is vital for safety.
- The Critical Importance of Fluid:
- Hygroscopic Nature: Most fluids (DOT 3, DOT 4, DOT 5.1) absorb moisture from the air.
- The Danger of Water Contamination: Water drastically lowers the fluid’s boiling point. Under intense braking, water can boil, creating vapor (compressible gas) in the system. This causes dangerous “vapor lock,” where the pedal feels spongy and the brakes lose effectiveness. Furthermore, water promotes internal corrosion of components.
- Replacement Interval: Due to moisture absorption, the fluid must be changed every 1 to 2 years or 20,000 to 40,000 km. Time is more critical than mileage.
- Checking, Testing, and Selection:
- Level and Quality: Check the level in the reservoir (between MIN and MAX). A low level may indicate pad wear or a leak. Never top up without investigating the cause. Color is also an indicator: new fluid is clear; old and contaminated fluid is dark.
- Test Pen: A brake fluid test pen measures conductivity to estimate the percentage of water, recommending replacement starting at 3% contamination.
- The Bleeding Process:Bleeding is the process of replacing old fluid, expelling moisture and air bubbles. The standard sequence runs from the wheel farthest from the master cylinder (usually rear right) to the closest one. For vehicles with ABS, a diagnostic scanner may be needed to activate the module valves and ensure a complete purge, preventing trapped air that could cause a spongy pedal.

Tip 4: Periodic Cleaning – The Key to Efficiency and Durability
Braking generates dust, and this dust, mixed with road grime, accumulates on brake components, compromising performance and accelerating wear. Cleaning is a simple yet crucial maintenance task.
- The Importance of Cleaning:
- Efficiency: A layer of dust between the pad and rotor reduces friction, increasing stopping distance.
- Noise and Vibration: Debris buildup causes squeals and grinding.
- Free Movement: Dirt and corrosion can seize slide pins and pistons, leading to uneven pad wear and directional pulling.
- Accurate Diagnosis: Clean components facilitate visual inspection for leaks and cracks.
- Frequency and Recommended Products:A complete cleaning is best during component replacement or periodic maintenance (every 10,000 km). Use aerosol brake cleaner, steel brushes, and, fundamentally, protective equipment (mask, gloves, goggles), as brake dust can be harmful.
- Cleaning Tutorial (Step-by-Step):
- Remove the Wheel: With the car safely supported, remove the wheel.
- General Cleaning: Spray brake cleaner to remove the superficial layer of dust.
- Deep Cleaning (during pad replacement): Remove the caliper and slide pins. Clean them thoroughly, removing old grease and dirt. Use a steel brush to clean the caliper brackets where the pads seat and the piston area.
- Wheel Hub Cleaning: When replacing the rotor, the hub surface must be impeccably clean. Rust or debris there will cause the new rotor to seat unevenly, leading to vibration.
Intelligent Driving: Maximizing Lifespan and Control
The way you drive has a direct and profound impact on the lifespan and effectiveness of your brakes. Small changes in your habits behind the wheel can make a big difference.
Tip 5: Proactive Driving – Your Habits Can Save Your Brakes
The driver is the biggest factor in brake wear. Smart, defensive driving not only increases safety but can also double component lifespan and even reduce fuel consumption.
- Driving Techniques to Preserve Brakes:
- Anticipation and Planned Braking: Look ahead. When you see a red light or slow traffic, take your foot off the accelerator. Allow the car to slow naturally with engine resistance and aerodynamic drag. Braking, when necessary, will be smooth and brief, avoiding temperature spikes and mechanical stress.
- Maintaining Safe Distance: Adequate space ahead of the vehicle allows you to absorb speed variations without needing to brake constantly. This reduces unnecessary brake use.
- Progressive Braking: Apply the pedal smoothly and gradually. This controls weight transfer, improves passenger comfort, gives the driver behind more reaction time, and reduces stress on components.
- The Vicious Cycle of Aggressive Style:Hard acceleration followed by harsh braking generates excessive heat, leading to a cascade of problems: fluid degradation, rotor warping, and pad glazing (drastic loss of friction). A smooth driving style keeps the system at lower, more stable temperatures, extending the lifespan of all components.

Tip 6: Master Engine Braking – A Powerful Ally
Engine braking is an underestimated deceleration tool, essential for professional and advanced driving, offering gains in wear, control, and safety.
- What It Is and How It Works:It is the deceleration effect when you take your foot off the accelerator with a gear engaged. Fuel flow is cut, and the vehicle’s inertia forces the engine to spin, creating resistance and slowing the car. This effect is stronger in lower gears. To learn more about your engine’s health, check out our guide on engine carbonization.
- Correct Application for Maximum Efficiency and Safety:
- Mountain Descents and Long Declines: Instead of overloading the service brakes, downshift to a lower gear (the same one you would use to climb the slope). This uses the engine’s natural resistance to control speed and prevents overheating and efficiency loss (fade).
- Urban Traffic and Approaches: Downshift sequentially when approaching stops. This slows the car in a controlled manner, saving the service brakes for the final stop.
- Correct Technique: Downshifts should be gradual to avoid excessive engine RPMs and unnecessary stress on the transmission.
- The Danger of Neutral (“Coasting”): Never go down a decline in neutral. This disengages the engine, eliminating engine braking and forcing the service brakes to bear 100% of the load, leading to overheating and failure.
- The Comprehensive Advantages of Engine Braking:
- Reduced Wear: Transfers the deceleration load to the engine, prolonging the life of pads and rotors.
- Overheating Prevention: Keeps service brakes cool for emergencies.
- Increased Control and Stability: Smooth deceleration through the driven wheels improves stability, especially on low-grip surfaces.
- Fuel Economy: In electronically injected cars, engine braking cuts fuel injection, saving fuel. Coasting in neutral, conversely, forces the engine to consume fuel to maintain idle speed.
Raising the Bar: Bedding-In and Performance Upgrades
For those seeking the utmost in safety and performance, it is essential to understand how to prepare new components and when to invest in high-performance solutions.
Tip 7: The Perfect Bedding-In – The Crucial Ritual After Component Replacement
New pads and rotors do not deliver their maximum potential immediately after installation. They require a controlled break-in procedure, known as “bedding-in,” which is vital for performance, quiet operation, and durability.
- What Bedding-In Is and Why It Is Vital?It is a thermomechanical process with two functions:
- Physical Adjustment: Smooths out microscopic surface irregularities, maximizing the contact area between pad and rotor.
- Creation of the Transfer Layer: Controlled heat transfers a thin, uniform layer of pad material onto the rotor. Efficient braking then occurs through the friction between the pad material and this transferred layer, ensuring an ideal friction coefficient.
- The Risks of Skipping Bedding-In:Skipping bedding-in and subjecting new brakes to severe use can cause:
- Pad Glazing: Extreme heat can “burn” the pad resins, creating a hard, mirror-like surface that drastically loses friction and causes chronic noise.
- Inconsistent Performance and Noise: Irregular contact and lack of a transfer layer result in weak braking, judder, and chronic squealing.
- Accelerated Wear: Irregular contact concentrates braking force on small areas, wearing out pads and rotors rapidly.
- The Step-by-Step Bedding-In Procedure:Always consult the manufacturer’s instructions. A general and safe method, to be performed in a safe area without traffic:
- Phase 1: Gradual Heating: Perform 8 to 10 gentle to moderate stops, reducing speed from 60 km/h to 40 km/h, without coming to a complete stop.
- Phase 2: Firmer Stops: Then, perform another 8 to 10 firmer stops, from 40 km/h to a complete stop, with a brief pause between each one.
- Phase 3: Complete Cooling: Drive for several minutes at a constant speed, using the brakes minimally, to allow the system to cool completely. It is crucial not to stop the car or keep your foot on the pedal with hot components, as this can “stamp” pad material onto the rotor and cause future vibrations.
- Moderation Period: For the first 300 to 500 km, avoid panic braking. This allows the transfer layer to stabilize.

Tip 8: Friction Upgrade – Choosing the Ideal Pads and Rotors for Your Use
Factory components are a compromise. To optimize performance, choosing pads and rotors specific to your driving style is fundamental. There is no single “best,” but rather the “most suitable.”
- Ideal Combinations for Different Profiles:
-
- Urban Use: Ceramic pads with smooth vented rotors. (Low noise, clean operation, and good heat dissipation).
-
- Highway/High Speed: Semi-metallic pads with slotted rotors. (High fade resistance, cleaning gases and debris).
- Track Day/Extreme Performance: Performance compound metallic pads with high-quality slotted rotors. (Maximum heat resistance and structural integrity).
The holes and slots in performance rotors are not just for cooling; they expel gases and dust generated at high temperatures, maintaining ideal friction contact.
-
Tip 9: The Hydraulic Upgrade – Maximizing Pressure and System Response
Performance isn’t just about friction; it’s about how pedal force is transmitted. Improvements in the hydraulic system, such as hoses and fluids, can transform the feel and response of your brakes.
- Steel Braided Brake Hoses (Aeroquip Style):
- Limitation of Rubber: Original rubber hoses expand slightly under intense pressure, consuming pedal energy and causing a “spongy” feel and delayed response.
- Aeroquip Solution: They replace rubber with a PTFE (Teflon) inner tube wrapped in a stainless steel braid, which prevents expansion.
- Benefits: Firmer pedal, faster brake response, precise modulation, superior durability, and abrasion resistance. This is a cost-effective upgrade with a significant impact.
- High-Performance Brake Fluids (DOT 5.1 and Higher):
- Raising the Thermal Limit: In sporty use, temperatures can exceed the limits of standard fluids. A quality brake fluid is as important as engine oil.
- DOT 5.1 Advantage: Formulated to have a significantly higher boiling point (e.g., 270°C for DOT 5.1 vs. 230°C for DOT 4), offering a crucial thermal margin against “vapor lock” under extreme conditions.
- Considerations: High-performance fluids can be more expensive and require more frequent changes due to higher hygroscopicity. “Super DOT 4” fluids also exist, offering performance close to DOT 5.1.

Tip 10: The Final Mechanical Upgrade – The Power of Multi-Piston Calipers and Carbon-Ceramic Rotors
For absolute peak performance, the most radical upgrades involve the calipers and rotor materials—technologies derived directly from motorsports.
- Caliper Upgrade: From Floating to Fixed Multi-Piston:
- Conventional Calipers (Floating): Use one or two pistons on one side, which push the inner pad, and by reaction, slide the caliper body to pull the outer pad. Efficient and low-cost.
- High-Performance Calipers (Fixed Multi-Piston): Rigidly mounted, they have multiple pistons (4 to 8+) on both sides of the rotor, pressing the pads directly.
- Advantages: Superior clamping force and pressure distribution, maximizing contact and stopping power. Exceptional rigidity (often forged aluminum monoblock) for a firm pedal and immediate response. Better heat management.
- Cost: This is a significant and expensive upgrade, best suited for track use or very high-performance vehicles, like the supercars you see in articles about McLaren, where every detail is optimized.
- Rotor Upgrade: From Cast Iron to Carbon-Ceramic:
- The Cast Iron Dilemma: Good balance of cost and performance, but heat dissipation requires larger and heavier rotors, impacting handling.
- The Carbon-Ceramic Revolution: Made from a composite of carbon fiber and silicon carbide, these rotors are the pinnacle.
- Advantages: Nearly infinite heat resistance (immune to warping and fade), consistent performance even under extreme temperatures. Radical weight reduction (up to 50% lighter than equivalent-sized iron rotors), improving agility, acceleration, and suspension response. Exceptional durability under normal use (can last the vehicle’s lifetime).
- Disadvantages: Prohibitive cost (tens of thousands of reais). Lower “bite” when cold on some compounds and higher susceptibility to impact damage.
Optimizing brake performance is a continuous journey that transcends the simple replacement of parts. It is a commitment to safety, vehicle longevity, and the pleasure of driving. By integrating the knowledge from this guide—from interpreting sensory signals to choosing cutting-edge components—you transform your braking system into a true dynamic control system. A car that brakes better is a safer, more reliable, and ultimately, much more enjoyable car to drive, allowing you to enjoy every mile with total confidence and command.